Showing posts with label recipe. Show all posts

Wednesday, February 9, 2011

Hello, Love

After over two years of diligently searching I've finally found the perfect...


I mean, check out the batter alone.


What's not to love. Now I realize that blueberry muffins are totally a matter of preference. Like that whole wheat recipe I tried. Blah! I think I only put the leftover batter in the freezer due to the price of blueberries.

But this recipe. It could totally be my life partner and I would gladly have it's babies and bring it coffee or beer or slippers or whatever blueberry muffin husbands desire. I mean, to quote King Arthur Flour "They're a good example of "cake-like" muffins, containing high amounts of both sugar and fat." How could you not fall in love after a sentence like that? If they were on match.com, that would totally be my ideal tagline. (Yes, at 13g of fat ONE muffin pretty much fills up my limit of fat grams in a meal under the Alli plan.) It feels so gratifying to find my blueberry muffin true love. I love the fluffy rich muffins our local grocery strore chain makes. I tolerated many eyerolls from the ex when I would bemoan how my muffins did not taste like theirs and get the inevitable "Than go BUY them from there!". He did not get me.


Well, there were a couple of modifications I'll do next time. I guess my love isn't totally blind. I would use a more stuesely top and I believe I will add an additional 1/4 c of sugar. I like my love sweet.

Will I share my path to true love? Of course.

The Perfect Blueberry Muffins (aka "Fancy Department Store Muffins")
Slightly adapted from King Arthur Flour 

2 cups unbleached all-purpose flour
1 tablespoon baking powder
1/2 teaspoon salt
2 cups fresh blueberries
6 tablespoons (3/4 stick) butter or margarine
1 cup sugar (or add 1/4c if you want to be like me)
2 large eggs
1 teaspoon vanilla extract
1/2 cup milk

STREUSEL:
1/2 cup sugar
1/3 cup all-purpose flour
1/2 teaspoon ground cinnamon
1/4 cup cold butter

Preheat oven to 375°F.

Combine flour, baking powder, salt, berries and nuts. In a large mixing bowl, cream butter or margarine with sugar until light and fluffy. Add eggs and vanilla, and beat well.

Blend dry ingredients into wet alternately with milk.

Because these muffins will rise up and over the edge of your muffin tin, you'll want to grease the top of the pan as well as the cups. Fill the cups almost full, and sprinkle with the streusel topping.

Bake muffins 25 to 30 minutes, or until golden brown. Remove muffins from oven and cool completely on a wire rack. (Although I can tell you that if you can wait long enough for the blueberries to cool enough to not scorch your mouth, they rock after about 10 minutes out.)

Nutrional information per serving (1 muffin, 106 g): 307 cal, 13 g fat,  21 g complex carbohydrates

King Arthur Flour suggests the following:

These muffins are wonderful made with tiny fresh blueberries, chopped, toasted almonds, and almond extract substituted for the vanilla extract.


I think that sounds like a fantastic idea, King Arthur Flour. Thank you.

I shared mine with the neighbors. Mainly due to that pesky high fat content. But feel free to lock your doors and hoard these lovelies. I won't judge you. Promise.


Monday, October 4, 2010

Fettuccine Alfredo-Low Fat Double Take

So, I figured I really should include low fat somewhere in that title so you didn't think I finally gave in to the urge for the aformentioned willlingly belly flop with a super ungraceful dive off the diet wagon. This is really hard to believe it's low-fat. I mean look at this picture, the cheesiness factor alone seems like you should gain a few pounds just from licking the spoon.


And it has bacon. I know. I promise this isn't a bridesmaid dress ploy. You know, where I make you all look bad in your nasty bridesmaid dress so I can shine in comparison to you.

This gave me the diet pick me up I needed to feel like I was indulging, but not.

Rich Fettuccine Alfredo
Yield: 6 servings.

Ingredients

8 ounces uncooked whole wheat fettuccine (I used the regular fettuccine noodles)
2 bacon strips, coarsely chopped
1/2 pound sliced fresh mushrooms
1 small onion, chopped
1 small sweet red pepper, chopped
2 garlic cloves, minced
4 ounces fat-free cream cheese, cubed
2 tablespoons cornstarch
2 cups whole milk
3 cups cubed cooked chicken breast
1/3 cup shredded Parmigiano-Reggiano cheese
1/2 teaspoon salt
1/2 cup shredded part-skim mozzarella cheese

Directions

Cook fettuccine according to package directions. Meanwhile, in a large ovenproof skillet, cook bacon over medium heat until crisp. Using a slotted spoon, remove to paper towels to drain. Saute the mushrooms, onion and pepper in drippings until tender. Add the garlic; cook 1 minute longer. Stir in cream cheese until melted.

Combine cornstarch and milk until smooth; stir into skillet. Bring to a boil; cook and stir for 2 minutes or until thickened. Add the chicken, Parmigiano-Reggiano cheese and salt; cook and stir until cheese is melted.

Drain fettuccine; add to chicken mixture. Heat through. Sprinkle with mozzarella cheese and reserved bacon. Broil 4-6 in. from the heat for 2-3 minutes or until cheese is melted.

Nutrition Facts: 1-1/3 cups equals one serving
417 calories
12 g fat (5 g saturated fat)
38 g carbohydrate


Friday, September 24, 2010

Spicy Shrimp & Peppers with Pasta

So, I finally put some action behind my rants and went on a low-fat diet. Not only a low-fat diet, but a low fat diet with Alli. If you have heard of the "adverse treatment effects" you know this means I have to mean business. If you don't know what I'm talking about, well, there are some things you just don't want to know about. I have lost six pounds in the last three weeks. Which I consider pretty good considering the first week I chose sitting with my knitting drinking wine on the couch and feeling sorry for myself a more worthy activity then exercising and this week I have been traveling pretty much all through.

The thing that always seems to make me willlingly belly flop with a super ungraceful dive off the diet wagon is that I get really bored of the food. And I have an unhealthy relationship with butter. But especially the whole food thing. So I've decided to post some recipes that are worthy when I find them. For Alli they have to be 15g of fat or below and with the calorie limit I chose for myself they need to be under 500 calories.

The first: Spicy Shrimp & Pepper with Pasta.


I really miss the dimension of flavors in "regular" food. This dish helped me snap out of that. It was pretty amazing if I say so myself, so I present to you the first of my low-fat recipe shares.

Spicy Shrimp & Peppers with Pasta

Adapted from Taste of Home-Healthy Cooking

Ingredients

1 cup sliced fresh mushrooms
1 medium sweet yellow or red pepper, cut into 1/2-inch pieces
1 medium green pepper, cut into 1/2-inch pieces
2 tablespoons olive oil
1 garlic clove, minced
1/2 teaspoon crushed red pepper flakes
1 can (28 ounces) crushed tomatoes
1 teaspoon Italian seasoning
1/2 teaspoon salt
6 ounces uncooked linguine
1 pound uncooked medium shrimp, peeled and deveined (I used cooked shrimp)
1 tablespoon dried parsley flakes

Directions

In a large nonstick skillet coated with cooking spray, saute the mushrooms, and peppers in oil until tender. Add garlic and pepper flakes; cook 1 minute longer.

Stir in the tomatoes, Italian seasoning and salt. Bring to a boil. Reduce heat; simmer, uncovered, for 12-15 minutes or until vegetables are tender.

Meanwhile, cook linguine according to package directions. Add shrimp to sauce; cook and stir for 5-7 minutes or until shrimp turn pink.

Drain linguine; stir into sauce. Heat through. Sprinkle with parsley.

Yield: 4 servings. (2 cups each)
Nutrition Facts
Calories: 385 calories
Fat: 10 g (1 g saturated fat)
Carbs: 53 g

Wednesday, July 28, 2010

A Bounty to Contend With

I love this time of summer. While it’s hot (and it’s seemed hot here a lot these days), I love when my friends and families gardens start being harvested. Something about having food growing by people I love makes the things I make with them seems even homier.
And the things keep rolling in. I can’t say no, I mean come on. But getting back from my trip to Chicago I was crunched to get to these veggies before they went bad. So for today

Cucumber,

And zucchini,

And green beans,

Oh my!


I’m actually going to concentrate on the zucchini this post, as I feel this is the best product of the three. While I was playing with my phone out at the campground last week and looking around allrecipes.com I came across this recipe for Zucchini Blueberry Bread. Then a few hours later I was handed a few zucchinis. And then I remembered that blueberries were on a killer sale at the store. It was meant to be and who am I to argue with fate? I recommend you give this a try if you have some zucchini sitting around begging to be used. Or if you have to go buy some. Whatevs. And recommend putting a crumbly top on this bread. Because a little more sugar and butter never hurt anyone. Well, maybe that's not true, but it still tastes excellent.


Ingredients


3 eggs, lightly beaten
1 cup vegetable oil
3 teaspoons vanilla extract
2 1/4 cups white sugar
2 cups shredded zucchini (apx 2 zucchini)
3 cups all-purpose flour
1 teaspoon salt
1 teaspoon baking powder
1/4 teaspoon baking soda
1 tablespoon ground cinnamon
1 pint fresh blueberries

Directions

Preheat oven to 350 degrees F (175 degrees C). Lightly grease 4 mini-loaf pans.

In a large bowl, beat together the eggs, oil, vanilla, and sugar. Fold in the zucchini. Beat in the flour, salt, baking powder, baking soda, and cinnamon. Gently fold in the blueberries. Transfer to the prepared mini-loaf pans.

Bake 50 minutes in the preheated oven, or until a knife inserted in the center of a loaf comes out clean. Cool 20 minutes in pans, then turn out onto wire racks to cool completely.

Servings: 4 slices per mini loaf (generous slices, yes)
     Calories per slice: 345
     Carbohydrates per slice: 50g (Sugars 30g)
     Nutrition Data based on nutritiondata.com calculations


Sticking with the allrecipes.com theme I made up some Garden Green Beans. I’m not sure I’m a fresh green bean kind of girl. They were okay, but maybe you’d like them better.


And lastly, I made some cucumber salad. I feel a bit of a bum even calling this a “recipe”. I used my trusty mandolin (the kitchen device, not the intriguing musical instrument) and sliced my cucumbers up nice and thin. Put some salt and pepper on top. Let them sit in the fridge a couple of hours. Added some dried onions (just because I didn’t have any fresh on hand, that would be even better) and poured some Ranch dressing over the top. This then sits another few hours and the result is always an amazingly simple and refreshing treat. I'm told it's not true cucumber salad. My husband threw out the "ghetto cucumber salad" comment. I do not care.


Any fruits and veggies you have sitting around the house?

Friday, July 23, 2010

Rollin' With My Homies

I hit the kitchen to ensure there would be no lack of freshly baked breads to nourish my family while camping last weekend. I literally came with about half a paper grocery bag full. (And four were left at the end of the weekend.) And I’m just now telling you about it, I know, you hate me. You were just dying to know this. It’s okay, these wounds will heal.
We were camping, so we of course needed some hamburger and hot dog buns. Now, I know it’s tempting to just pay the damn $.99 at the store for some buns instead of waiting through the rising and kneading for ten minutes and all that fun stuff. But I promise you, pinky swear on a double dog dare that these are worth it. Even my brother who turns his nose up to anything that defies Pillsbury kept sneaking these.

Hamburger Buns & Hot Dog Buns Worth the Work
Not Quite Right, but Still Yummy Potato Rolls
My parents were raving about potato buns and were so sad the Amana bakery doesn’t make them anymore. So I decided to surprise them and make up a batch. I was confident I nailed it. Turns out I didn’t.Even though I went to the work of using locally grown potatoes and all the process of boiling and mashing by hand, I still didn't. Apparently the bakery used potato flour to make an amazingly soft and fantastic potato roll. This led to one of these conversations with my grandpa I will cherish forever as he shared baking secrets with me such as the ratio of potato flour to put in bread to give it some extra softness and that malt will do amazing things to the flavor of white bread. We talked for at least an hour around the picnic table and I wish my memory had a record mode so I could relive it for years to come. He shared tales with me about experimenting with bread doughs for better recipes, long hours in hot bakeries, rebuilding bakeries from the group up, and the good times with family over the years of a part of the Amana heritage my family has had a key role in. I was enthralled and I don’t know that I’ve ever felt such a tie with my grandpa before.

Hamburger & Hot Dog Buns Worth the Extra Work
 
The original recipe was from allrecipes.com, but I did some changes to this and I think it made for a tastier bun. The original didn't allow for rising time, which I feel would have made for a much denser bun. I like some fluff.
 
Ingredients
 
1 cup milk
1/2 cup water
1/4 cup butter
4 1/2 cups all-purpose flour
1 (.25 ounce) package instant yeast  (2 1/4 t.)
2 tablespoons white sugar
1 1/2 teaspoons salt
1 egg
 
Optional:
1 egg plus a little water to make an egg wash
Sesame seeds
 
Directions
 
1) In a small saucepan, heat milk, water and butter until very warm, 120 degrees F (50 degrees C).
 
2) In a large bowl, mix together 1 3/4 cup flour, yeast, sugar and salt. Mix milk mixture into flour mixture, and then mix in egg. Stir in the remaining flour, 1/2 cup at a time, beating well after each addition. When the dough has pulled together, transfer to a large bowl coated with oil. Turn dough once to coat with oil. Cover and let rise in a warm place until doubled, about one hour. (Or half an hour in my oven like sewing room!)
 
3) After dough has doubled, turn it out onto a lightly floured surface, and knead until smooth and elastic, about 8 minutes.
 
4) Divide dough into 12 equal pieces. Shape into smooth balls, and place on a greased baking sheet. (At this point I coated the buns with an egg wash and sprinkled the sesame seeds on top.) Flatten slightly. Cover, and let rise for 30 to 35 minutes.
 
5) Bake at 400 degrees F (200 degrees C) for 10 to 12 minutes, or until golden brown.
 
For Hot Dog Buns: Shape each piece into a 6x4 inch rectangle. Starting with the longer side, roll up tightly, and pinch edges and ends to seal. Let rise about 20 to 25 minutes. Bake as above.
 
Calories per bun: Apx. 230

Monday, July 5, 2010

Some Tastes of Home

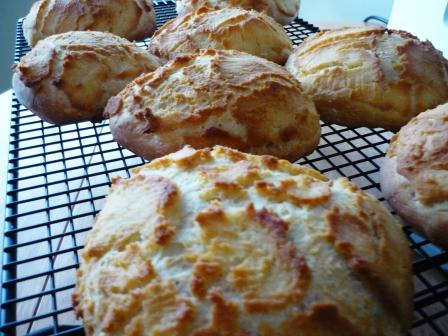
It's probably not everyday some gets a craving for corn cob jelly. Well, first you'd have to have heard of it, which may the rarity in itself. I spent some years as a teen working in a bakery that is the retail bakery of the line of Amana bakeries most of my family has worked for. Summers were filled with Dutch Crunch Bread slathered with Corn Cob Jelly. Amazingness. I was a little weirded out at first, I shall admit that. But I would venture to say you haven't lived until you've had this combo. Simple in it's deliciousness. Eclectic in it's existence. So I'm sure you can see why it's close to this heart (and stomach!).

So I was actually looking for a recipe for some potato rolls like the bakery used to make after my parents were raving about how good they were and lamenting that they are no longer made. But I'm sure we shall discuss these further later. I have today off work and after scouring the internet, putting in a call to my Auntie Renee who used to manage the retail bakery that sells the bread to get some advice on some discrepencies I saw between different recipes (I wanted it to be as close to THAT BREAD as possible) I headed off in search of some canning jars and white rice flour.

The results. They rocked. Well, okay. The bread is cooling right now so I haven't actually tasted it, but it looks just like I remember, so I'm pretty confident.

Let's start with the jelly...


Corn Cob Jelly

12 sweet corn cobs

8 cups water (the original recipe calls for only 4 cups, but this left me with only 1 cup of liquid in the end)
4 cups sugar
1 box fruit pectin

Bring water with cobs, to a boil, boil for l0 minutes. Measure 3 cups liquid and strain through a cheesecloth.

Put strained fluid into a large saucepan, add pectin. Bring to rolling boil. Add sugar, bring mixture back to a boil. Simmer for 3 minutes, then skim. Add food coloring, if desired. (My pics do not have food coloring added.)

Pour into scalded jars and seal. Jelly will be clear and taste like apple-honey.


Now, for the bread.


Dutch Crunch Bread


Bread


2 1/2 tsp. active dry yeast

1/4 cup warm water 

1 cup warm milk

1 Tbsp. sugar

2 tsp. vegetable oil

1 1/2 tsp. salt

2.5 - 3.5 cups all purpose flour

Topping
(from The Bread Bible)

1 Tbsp. active dry yeast

1/2 cup warm water

1 Tbsp. sugar

1 Tbsp. vegetable oil

1/4 tsp. salt

3/4 cup white rice flour  (I found this in the health market section)


1. Place sugar and yeast along with the warm water, warm milk and oil in your bowl. Mix for 30 seconds and let sit a few minutes until dissolved.

2. Mix salt with 2 1/4 cups flour and to the bowl, mixing on medium until the dough comes together.

3. Switch to dough hook and slowly add the last 1 1/4 cup until bowl pulls away from the side of the bowl. I ended up adding a total of 2 3/4 cups.

4. Knead by hand until tacky and smooth or on medium with mixer. 

5. Place dough in an oiled container and let rise until it has doubled, approximately an hour.

6. Turn out dough onto lightly floured surface. Shape into 8 balls and place on lined baking sheet, and cover. Let sit for 15 minutes.

7. In the meantime, mix up topping. Dissolve yeast and sugar in water. Add in vegetable oil. Then rice flour. Whisk all ingredients together until you get a thick cake batter-like consistency. It should be smooth. Let sit for the rest of the 15 minutes, plus another 10 minutes.

8. Rolls should have risen a little bit by this point. With a brush, spread topping all over each of the rolls. This should be done in a thick layer. Brush a generous layer on each roll, using up all of the batter. This step is why you need parchment or a silpat on your baking sheet.

9. Let rolls rise for another 20 minutes until puffy. In the meantime, preheat oven to 350F.

10. Bake for 25 to 30 minutes, until golden brown. Let cool.

The original recipe recommends you  let them cool before tearing into these little lumps of deliciousness because the topping tastes a bit weird until it's completely set and cooled. Now I'm just waiting for my moment of justification for the 3+ hours I spent in the kitchen this afternoon..

Servings: 8
Calories per little loaf: 312
Carbs per little loaf: 59g
(per nutrititiondata)

Monday, June 7, 2010

Weekend in Review

All in all I had a pretty domestic weekend. How was yours?


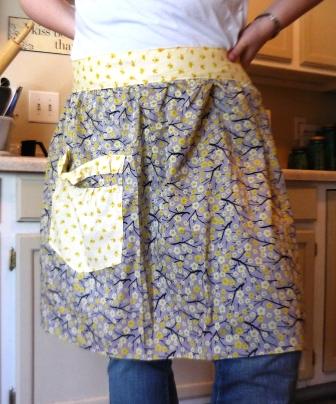
Saturday I am proud to say that I finally finished an apron for ME!! Yes, ME!! This was the fourth I have made in the last couple of months. The one I was wearing was pretty sad. It was to that point where no matter how many times I washed it was still crusty from the flour and what not. It led a good life. It has retired to a nice resort in Florida with a view.

I’ve really been digging the yellow and gray combo for awhile. I bought this flowered fabric a couple of years ago, but it seemed a little old lady for everything. But not this apron. The pattern for this is from McCall’s M3979 American Hostess Vintage Aprons. I had to do some changes once it was all said and done. The top and was WAY too high and stuck out in a funky way. And to be honest I’m not crazy about the pocket bulging like that. It looks like it’s just begging to catch flour and other little bits for a disgusting result.


But it’s kind of growing on me. It got a test run yesterday with this Asiago-Laced Rosemary Bread. I did some double duty for the bake-along. Last week’s theme was bread. I have had this recipe that I tore out of some random magazine at work kicking around for awhile and I happened to have some asiago cheese I didn’t mind getting out of the freezer. In all honesty, I haven’t tried it yet. I was (finally) getting my butt in gear yesterday and putting away the laundry that still had laundry from LAST summer to sort through. (I am not kidding. Nothing like putting away 10 months of laundry to make me swear off shopping for some time!) My apartment was toasty while I was baking this bread and the smell of asiago kind of overpowered the place, so I wasn’t wanting any warm bread with those two factors at play. My husband did have a piece this morning, however, and gave it his stamp of approval. And he doesn’t use that stamp very liberally! I intend to bust into this bad boy tonight!


I also got a head start on this week’s bake-along. We are making homemade pizza dough, which I have not done before. I don’t think I’ll willingly go back to frozen pizza or even store-bought crust! My little Italian friend gave me her recipe. It was great. I also made some pizza sauce from scratch. Recipe below. It does have a bit of kick, though! And I actually got two pizzas worth out of the recipe!


Happy Monday!

Exquisite Pizza Sauce from Allrecipes.com

Ingredients

• 1 (6 ounce) can tomato paste
• 6 fluid ounces warm water (110 degrees F/45 degrees C)
• 3 tablespoons grated Parmesan cheese
• 1 teaspoon minced garlic
• 2 tablespoons honey
• 3/4 teaspoon onion powder
• 1/4 teaspoon dried oregano
• 1/4 teaspoon dried marjoram
• 1/4 teaspoon dried basil
• 1/4 teaspoon ground black pepper
• 1/8 teaspoon cayenne pepper
• 1/8 teaspoon dried red pepper flakes
• salt to taste

Directions

1. In a small bowl, combine tomato paste, water, Parmesan cheese, garlic, honey, anchovy paste, onion powder, oregano, marjoram, basil, ground black pepper, cayenne pepper, red pepper flakes and salt; mix together, breaking up any clumps of cheese.

2. Sauce should sit for 30 minutes to blend flavors; spread over pizza dough and prepare pizza as desired.

Thursday, April 15, 2010

Raspberry-Almond Rolls & A Flashback

I was born with baking in my blood. As I have mentioned, I come from a rural area of Iowa called the Amana Colonies. My great-grandfather immigrated from Germany and at family reunions I would hear German being spoken in the background. Later I would hear German being yelled from the kitchens of restaurants I worked in as a teen and college student. While the Amana Society Bakery is in fact owned by the society (after the colonies chose to move away from being a closed society in the 1930's the society took control of the communal property such as the farms, the woolen mills, and also the bakery), my family has managed this bakery for as long as I can remember. As a child I would go with grandpa to pull sponges (pre-fermented starter dough, consisting of flour, water, and yeast) for orders. My brothers, cousins, and I would play in the dark bakery. Flour would be in the air and made for an awesomely slick service to slide on. We would play among carts, cooling racks, and in the loading dock and try to stay out of the way while the grown-ups handled the hot bread. My mom would tell me how she used to like to play in the area with the frosting when she was little.

When I got a little older my first job was at the retail shop. A place called the Stonehearth Bakery, also owned by the society and managed by my grandpa. I didn't get to play with the pasteries, I was a retail girl. We would snatch warm cookies off the cooling racks, have fresh baked bread with locally made jelly for lunch, and have to go home and wash off the sugar, flour, and sweat that coated our bodies before going out for the night.

However, it wasn't until this last year in my 27th year of life that the baking that is in my genetic code really took hold of me. I had dabbled in making sweets, but nothing too serious. However, when I made my first yeasted recipe this last year the smell of the yeast wafting up at me suddenly brought me back to being a child as my grandpa hugged me. He always smelled like yeast. A rush of memories overtook me and I was in. So now it comes as no surprise to me that yeasted recipes are my favorites.

Raspberry-Almond Rolls adapted from bhg.com

This week's bake-a-long is around almonds. The recipe I decided to try for Raspberry-Almond Rolls has you starting your dough in a bread machine. I do not have a bread machine, so I decided to adapt this recipe a bit. Below you'll see directions to make this sans a loaded kitchen. And there is just something about the satisfaction of a wooden spoon in hand...

You'll need:
1 c. water
1 egg, beaten
2. T of margarine of butter, soft
1 package of active dry yeast (2 1/4 t.)
1/4 c. sugar
1/2 t. almond extract
3-4 T. raspberry jam
1 (8 oz.) can almond paste (for best results the original recipe recommends you use a paste without syrup of liquid glucose)


In a large bowl mix together the first 5 ingredients (water, egg, butter, yeast, sugar) with a large wire whisk. Let this mix set for 15 minutes. Next mix in the almond extract.


Add the flour about a 1/2 cup at a time. Add additional flour if needed (you want your dough to be soft, but not so sticky it sticks to your fingers). Butter a large bowl with a lid. Place your dough in the bowl and cover with lid.

I have a trick for you! Put some towels in the dryer for 10 minutes or so. TURN OFF YOUR DRYER and nuzzle your covered bowl in the towels. DO NOT TURN THE DRYER BACK ON! This cuts your time in half (and there is the perk of seeing family and friends faces as you head down to put your bowl of dough in the dryer!). If you use the tip, it should take about 20-30 minutes for your dough to rise. I did not use my trick, as I was trying to get supper going and needed to buy some time, so it took me an hour with the bowl on my counter in my little toasty kitchen (it was 80 deg in there last night!).


Once your dough has doubled in size, punch it down a bit to get any air out. Lightly flour your counter and put your dough out. Roll your dough into a 12x10 inch rectangle.


Next spread your jam on the dough. It works best if the jam is room temperature. The original recipe called for 3 T, but I put 3-4 because you want your dough to have a thin coating, but not so much jam it will gush out when you roll it. Next crumble your almond paste into small pieces and sprinkle it over the dough.


Roll up the dough into a spiral; starting from a long side. Be sure to pull the dough in a bit as you roll so you can be sure to have a snug roll. Seal the seams.


Slice into 1 inch thick slices. The recipe said 12, but I actually got 16. Just make sure to keep them at about 1 inch.


Place rolls, cut side down , 2 inches apart on a baking sheet that is either greased or has parchment paper on it. I actually only baked off six of my rolls and put the other six in the freezer. For the ones that went to the freezer, we're all done. The night before I want to make those I'll put as many as I want on a baking pan and let them sit overnight. These will rise as they thaw out.


Some to bake                                          Some to freeze for later
For those you'll be making now (which can be all if you wish), cover these and let them rise until they are nearly double in size, about 30 minutes.

After they have risen back these in a 350 degree oven until golden brown. This will be about 18 minutes for individual rolls or 30 minutes if you put them in a roll pan. When they are golden brown you can put them on a rack to cool for about 5 minutes.


Next step is the frosting. You want to make you're own. Why then, keep reading.

Powdered Sugar Icing

In a medium bowl stir together 1 cup of sifted powdered sugar, 1 T. of milk, and 1/4 t. of vanilla. If you need it runnier, add a bit of milk. Thicker? Add a bit more sugar. You want it to be of drizzling consistency,


Drizzle the frosting over the rolls and you, my dear, have an amazingly delicious treat.

Things were a bit crazy for me as I was making these and trying to make my supper. Luckily, I have an amazingly attentive helper who never leaves my side.


A few steps away keeping a "watchful" eye on my baking.

Friday, April 9, 2010

Pie. Friday.

First off-two words. Pie. Friday. But you’ll have to wait for it.

I was on my way home from work today after making two stops for alcohol. One for wine and then on second thought some beer while for while I wait for my friends to get here to drink wine. It was a bitch of a day to end one hell of a week. I was listening to a Christian radio station and they were interviewing a new band. The band was talking about how cool it was to be playing alongside bands they grew up listening to. They mentioned the song “What if I Stumble” and suddenly here I am driving in “rush hour” (I live in Iowa) traffic with tears in my eyes.

I grew up in the Lutheran church, but then spent a few years as an agnostic. When I was really struggling with coming back to God I knew that I was in it all the way or not at all. I couldn’t do this whole “social Christian” thing I had seen growing up. Just going to church on holidays but really not letting God have much control over my life Monday-Saturday. So I fought Him for a long time. Not long after I first made the leap my husband (then boyfriend) played the DC Talk song “What if I Stumble” for me. It brought me to tears. I felt so much pressure. I thought as a baby Christian I was embracing the love of a God in a way different from I understood it growing up, but instead I was just vowing to not mess up. I was so afraid I would be a hypocrite.  But I did mess up. I used to cry over the idea of not being good enough for God’s love and the pressure of not knowing how He could love me if I ever stumbled and fell away from Him. But I did. And He still does. In the end the biggest instance of being a hypocrite for me was not accepting the grace I believed in for so many others.  Amazing how different these words can mean to me over seven years later.

What if I stumble, what if I fall?
Will I lose my step and make fools of us all?
Will the love continue when my walk becomes a crawl?
What if I stumble, what if I fall?

What if I stumble, what if I fall?
You never turn in the heat of it all
What if I stumble, what if I fall—
Everyone’s got to crawl

Do they see the fear in my eyes?
Are they so revealing?
This time I cannot disguise
All the doubt I’m feeling
You’re up against a wall, it’s about to fall
I hear you whispering my name you say
“My love for you will never change”
Now for the pie.

For this week's bake-a-long the theme was ginger. Bitter truth, not a ginger fan. However, this pie has seriously made me reconsider this position. Seriously. However, rewind back to before I knew of my upcoming challenging of my ideas on ginger, so Tuesday. I knew that I would be baking a pie this week. I also knew that I couldn't (shouldn't) eat a pie alone. Due to having to work late Thursday I had to miss knitting this week. So, it seemed like a great idea to invite a couple of good friends over for pie.

Ginger Pear  Pie from All Recipes

3 T. cornstarch
1/4 t. ground ginger
1/2 c. water
1/2 c. dark corn syrup
1 t. lemon juice
1/8 teaspoon grated lemon peel
4 large pears, peeled and thinly sliced
1 T. butter or margarine
9 in. pastry shell

Topping:
1/2 c. flour
1/4 c. packed brown sugar
1/8 t. group ginger
1/4 c. cold butter
1/4 c. chopped pecans

Preheat the oven to 425 degrees.


To start off with I made my pie crust. The crust called for a bought shell, but hell no. That's not how we roll here. I don't like the funny aftertaste, but hey, to each their own. I made the shell first so it was done, but put it in the fridge while I made the filling so the butter didn't get too warm.


Next for the filling. In a saucepan, combine the first six ingredients until blended. Gently stir in the pears. Bring to a boil over medium heat, stirring occasionally; boil for one minute. Add butter.


Pour the filling into the pastry shell.  For the topping combine the flour, brown sugar, and ginger in a bowl. Cut in the butter until the mixture resembles coarse crumbs. Sprinkle over the pear fillling.

Bake for 20-25 minutes or until the topping is golden brown.

We let the pie sit for 30 minutes or so. It was still nice and warm, but the filling was a little firmer this way. Sided with ice cream and it was amazing. What a great reason to spend a fabulous Friday night with fabulous friends. Most definitely the stage for a new tradition. Pie Friday sounds like a great way to end every week. Even ones that don't have you wanting to crawl in the fetal position under my desk. My friends rock. Pie is great. It's on.


Wednesday, April 7, 2010

Some fruit salsa a day keeps the gloom away...

Isn’t it fun how you can just really stick anything in that phrase and it sounds fun? “A sticky elephant a day keeps the squirrels away”.

It was a very dreary rainy day here on the front porch of Iowa. One of those days that would make you a bit tired and down and I had lots on my mind today. One of those days that makes me look heavenward and mutter “Can you toss me a frickin’ bone here?”.


But fruit salsa can make things better. There were some strawberries left over from a breakfast meeting today and some tortillas getting hard in the fridge. Game time.

So…

Some of these


plus some of this


gets you to this.


I waited patiently until after supper like a good girl, then put it all together and treated myself to this


Now it’s still raining outside, a row of my lace kicked my ass, and I still feel a little bitch slapped in a few areas of my life, but for now even the wine has a smile. Cheers!


Fruit Salsa with Baked Cinnamon Tortillas

1 Fuji apple-peeled, cored, and diced
1 c. sliced fresh strawberries
2 kiwis, peeled & diced
2 bananas, peeled & diced
1 T. fresh lime juice
2 T. white sugar
¼ t. ground cinnamon
¼ t. ground nutmeg


In a medium bowl, mix together fruits, lime juice, white sugar, cinnamon, and nutmeg. Cover and chill approximately.

Baked Cinnamon Tortillas
Tortillas
Butter
White Sugar
Ground Cinnamon
Preheat oven to 350 degrees. Brush tortillas with a thin layer of butter and lightly sprinkle desired amount of sugar & cinnamon. Bake for 10-12 minutes or until tortilla begins to bubble and get crisp around edges. Using kitchen shears cut into triangles. I recommend cutting them straight from the oven while they are warm and still a bit soft. These are best served warm, so I just bake up a couple at a time to eat for myself when I want some salsa.


Sunday, April 4, 2010

Easter and Food, Lots of Food

I deduced at a table surrounded by food today that I do not gorge myself with food on Thanksgiving. It is really and truly Easter. See, I'm a German chick from an area called the Amana Colonies in East Central Iowa. We believe in a food concept called family style. For those unfamiliar this means that huge bowls of lots of food are brought to the table and they are passed. And then when they are empty they are refilled and passed AGAIN. This keeps going until you can no longer move. I grew up with eating and working in these restaurants (and smelling of saurkraut) and for Easter this is how we celebrate (along with going to my home church at 6:00am Sunday morning, which my brothers get up for because you only get breakfast if you go to church.). It is delicious, really. Words like "diet", "low cholesterol", and um, portion size are not in the vocab. Best of all is breakfast Easter morning. Swedish style pancakes (but we don't talk about the fact these are not really German. For us they equal the Amanas) with CORN COB SYRUP. What you, say. Did she have a sugar high and mistype?  Nope. This is amazing. I promise.

Speaking of promises, I mentioned some lemon crumb muffins. I made them. Also amazing.

The recipe for the Lemon Crumb Pancakes Muffins is from Taste of Home. Light, delicious, and did I mention amazing? I made up the batter before heading the shelter on Friday night and pulled it out when I got up Saturday to mix up a batch before heading to the parents. Topped with stresuel and lemon sugar glaze, did I mention amazing?


I could actually just lick the muffin paper clean right at this point.
But self control means I get to have some with glaze and they really are
better this way. So go with self-control.

Sewing has taken a bit, umm, longer than planned. More on that soon.


"Family style" after the family style.
Now back to appropriate portions till next year!